Showing posts with label technology. Show all posts

Sunday, September 20, 2015

Listen to Current Events with Listen Current


Sometimes getting students to read about current events takes some encouraging. Many would rather listen to their earphones. Alternatively, some may have reading difficulties or be auditory learners. Here is where Listen Current comes to the rescue.  Listen Current utilizes public radio broadcasts of current events and stories related to History, ELA, and Science to help build students' listening skills. This is right in line with the Common Core. They also provide discussion questions that can be utilized as extension activities. There are a variety of topics available at the middle school and high school level to engage your students with.


Another great feature of Listen Current are there pre-made Socrative quizzes. (Socrative is a free data gathering tool that you can sign up for) You can check for understanding with your students quickly by having students go on to their electronic device whether it is a computer, tablet, or cell phone and take the quiz.

Let's get our students working on their listening and discussion skills and fostering their civic skills.

The process is rather simple to utilize the Listen Current quizzes. Just follow these steps:

Copy the code for the desired quiz and go to your Socrative account.

Go to the Manage Quizzes tab and select Create Quiz

Paste in the SOC- # in the Import a Socrative quiz from another teacher box

You can select the quiz settings to control the pace as the teacher or allow the students, as well as whether to display student names and randomize the question order.

Go to your Dashboard tab and select Start a Quiz

Have your students log in as students and give them you classroom number to have them take the quiz.


Monday, September 8, 2014

Collecting Data with Google Forms


Google Forms is a great tool for teachers to use. Most people rave about the utility of Docs and Presentations…. These are great too. There are so many possible uses for Forms in the classroom. One can survey a class, utilize it for “March Madness” takes on history, and create a DBQ with answer sheet for students. One of my favorite ways to use it is to collect student work. This is an especially great tool when students be presenting their work. If collecting digital products ahead of time, it makes for seamless class management. You will have all the assignments, no need for students to log in to sites to pull up their project, student groups unable to go because person x is absent, or group y can’t go because person z left their flash drive at home…You will have all products ahead of time.

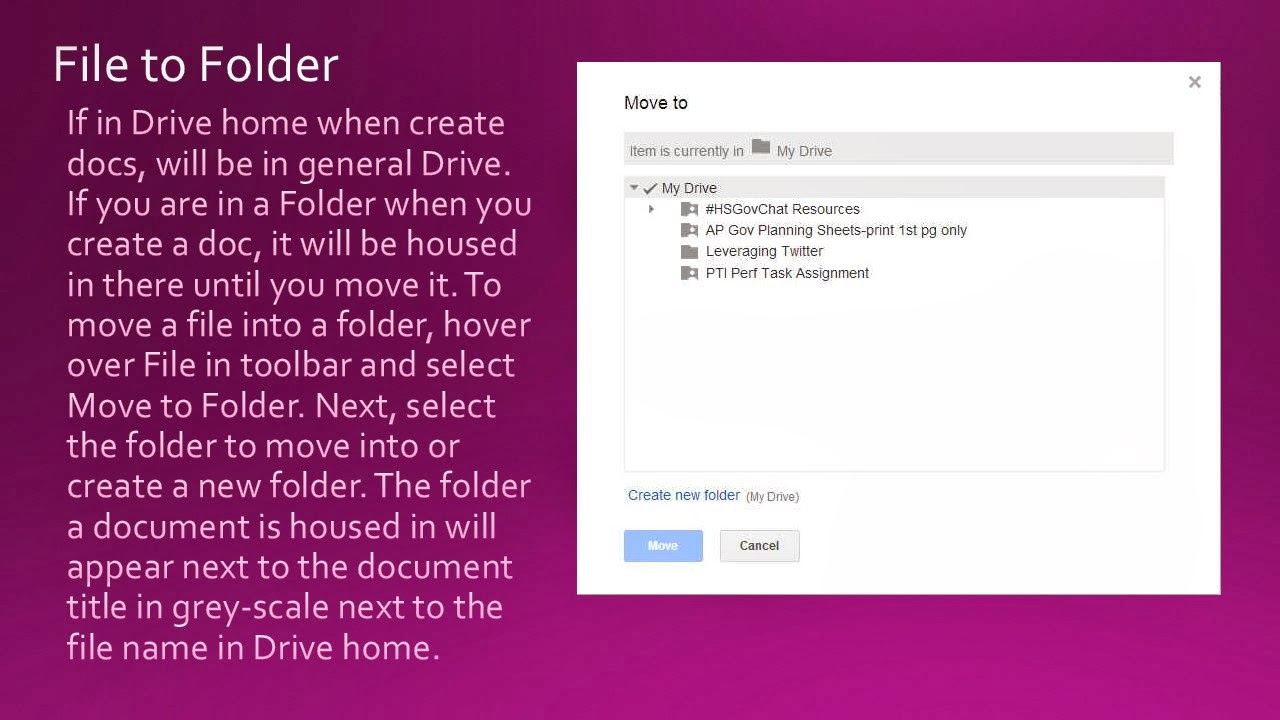
Forms are quite simple to use. Select Form from the Google Drive Create button. Select the theme you would like to use, you can always go back and change this later on. I would suggest labeling the form with template at the end. I have found that creating a folder with your templates allows you to easily make copies for additional class periods and the years to follow. Select the type of question you want to ask and type away. If you want a question to be required, check the required box and students MUST answer this before submitting the form. You can even embed an image or video into your form. If you decide that you want to move questions around or copy a question to make minor modifications you can easily do this as well.

Once you are finished creating the Form, select how you want to issue it. As mentioned earlier, it is easy to select Make a Copy under file to copy a form and add the class period at the end if you wish. Make sure you select Accepting Responses to make the form live. Select the blue Send button to share the form. You can email the form, get a link to hyperlink to on your own class website, or get an embed code to embed on your class website. Once you have responses, you can go to your responses spreadsheet of select view responses. Responses will be time stamped. You can also select view Summary of Responses to view responses in a graph format for easy visualization.


Here are some sample Google Forms as a semester survey, to collect student work, and as a DBQ.


Saturday, May 17, 2014

Explore the World with Google Cultural Institute


If your school is like mine, you do not have funds for field trips to museums or historic sites. Thanks to the Google Cultural Institute, you can bring museums and historical sites into your classroom virtually. The ability to bring in art pieces and visit historical sites can lead to some GREAT discussions. This is an especially great opportunity for those shy and artistic students to be engaged, demonstrate their understanding of the content and feel empowered. You may want to plan additional time for using these pieces, at least I have always found this to be true… the students are SOOO engaged! Upon arriving at the site, there are three projects; Art Project, Historic Moments, and World Wonders. There are many possible uses of the Google Cultural Institute by teachers and students.


Once you are in the Art Project, you may explore by collections, artists, and artworks. Once you find an art piece of interest you can zoom in to amazing clarity and view the colors, textures, and brush strokes- this is great for discussing art movements. In addition to the zoom factor, you may select on details located to the left of the image to learn more about the art piece.


In the Historic Moments collection one will encounter monuments, collections, and videos. Select a moment and explore the slideshow. This is a great resource for inquiry and examination of primary sources. The format is very student friendly and similar to a museum exhibit. Select Discover on the bottom left to find other similar exhibits. Students and teachers can also save exhibits to return to later on.


Then there is World Wonders where you will find locations, places, art, and street views in some instances. This is a great tool to explore historical places and examine the architecture and landscape. Simply select locations to bring up a map and select a blue dot of the location you wish to explore. Once you find a location, simply select it to access available street views, items, and videos.

If this was not enough, you or your students can also curate your own gallery (think student creating a multimedia presentation for CCSS). The possibilities of what one can do are only limited by one’s imagination. Teachers can take students on virtual field trips or curate resources for class discussions on cultural or historic sites. Collections or your own curated gallery can also be shared with students in webquests, as part of a PBL unit, or via Google+, Twitter, or email with the share icon. This also has potential for students researching topics for class assignments, projects, or history day. Additionally, the curation tool lends Google Cultural Institute to be utilized by students to curate their own multimedia presentations for classroom presentations, digital portfolios, or blog entries.Students may carry out their curiosity outside the classroom in exploring the world, even creating their own bucket list of places to explore.

Saturday, October 12, 2013

Collaborating with Google Docs


       Google Docs, housed on Google Drive, have a limitless possibility in the ways teachers can utilize them to meet the 4C's of the Common Core (creativity, collaboration, critical thinking, and communication). Additionally, using Google Docs eliminates the need for costly Microsoft software and formatting issues. How many times has a student told you their computer crashed, they lost their flash drive, student x is absent with the PPT/doc, they forgot to save the file, or the computer will not open the file? Google Drive eliminates all of this! It automatically saves the document, students can share the document and work on it at the SAME time ( I have had a whole class of 37 students working on 1 CST PPT for review at the SAME time), it is stored in the cloud, and eliminates the cannot open file issue with different formats. As long as you are connected to the internet, you can access the file. It is also available as an app on android and ios devices.

       To begin, have students create a Google Drive account. When in Drive, you can create a document (similar to a doc), presentation (similar to a PPT), spreadsheet (similar to excel), form, drawing, or folders. Once students get used to the sharing and privacy settings, Google Documents are transformational and students generally will gravitate to them. They also allow you to see the revision history so you can see exactly when and who was active on the document. Students can create a Doc and you can have them share it with you and/or another student enabled to comment. This can be used as an exercise to write , collaborate for revision, and then have the student revise the Doc for final submission. If you are completing a group project in class or for National History Day, multiple students may edit a document. Teachers may also have students create a folder with their writings/inquiry throughout the year to serve as an electronic portfolio.

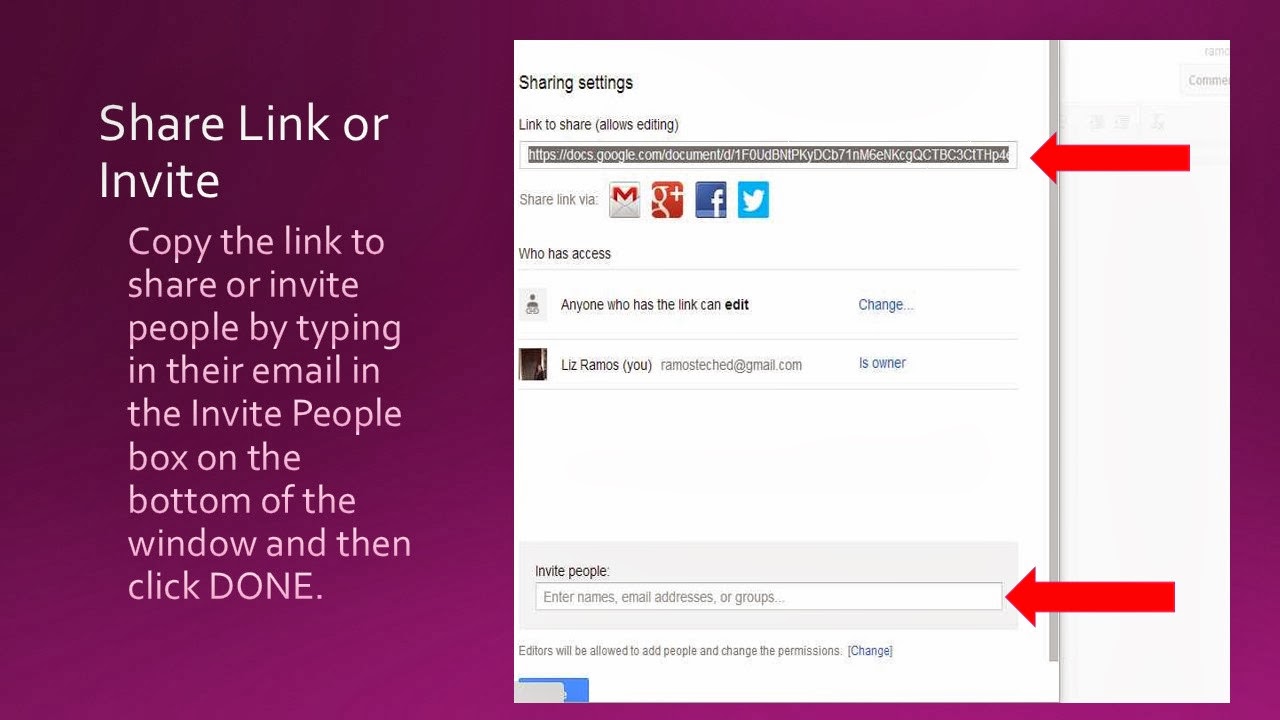
     Here are the steps to creating a Google Document and sharing it:


Monday, September 23, 2013

Note-taking Tools

With teachers having multiple devices and students using tech tools in class and a different device at home, note taking platforms are in demand. Two options, which many teachers are using themselves and with students for portfolios, are Evernote and Notability.

Evernote works on a variety of platforms and syncs on multiple devices (android and ios). You can take notes on Evernote, insert images, and record audio with text notes. It is great for students who begin research in class at school and continue it later on. They can resume where they left off and retain links they saved earlier with Evernote's webclipper tool. Teachers and students can even save tweets too. Evernote provides a variety of tutorial videos to support its product.

Another product for note-taking is Notability. This is an ios app compatible with the ipod, iphone, and ipad. It is a $2.99 download from the Apple Store. While taking notes in Notability you can type, use touch screen with your finger or stylus, add images, capture a webpage, and record audio. Users may export their files in PDF or email and may back them up to Google Drive or Drop Box. Cnet has provided a guide for getting started with Notability.


Saturday, September 14, 2013

Give students a voice in visual literacy with Voice Thread


       Examining primary sources and evaluating data is an important skill in history. This skill is also explicitly addressed in the Common Core State Standards across the grade levels. Teachers are called upon to engage students in historical inquiry. Often times students are weary of speaking in class. Additionally, more schools are gaining access to technology and looking for ways to leverage their devices in meaningful ways. Voice Thread is a collaborative conversation tool to foster inquiry with text and visuals.

       Voice Thread is easy to use and provides versatility. They have included a vast number of images one may select from their media options. Teachers can also upload images, insert a video, or convert a PPT for students to engage with. A teacher may insert part of a primary source text, image, or chart into a PPT and type a question(s) for student analysis/reflection. If using a PPT, the teacher/user must first convert the file into a JPEG. Students have found the tool engaging. There are a variety of response options available. A student may type a response, circle part of the image of text with the writing tool, use the writing tool to focus on part of the image and type a response, text a response, or record a video response. Students must create an account for free using an email address before they can post. Once a teacher has created a Voice Thread, they may share with with the students via email, sharing a link in class, or they may embed the voice thread on a website. It is also available as an app.

       The following instructions walk you through creating a Voice Thread, including how to convert a PPT to use it in the program.


Sunday, April 21, 2013

Twitter Power

Twitter is a powerful tool. Do not underestimate its potential for teachers and students! Those in the know are harvesting the many benefits. Twitter is a source of constant information regarding education pedagogy, Common Core, flipped classroom, educational technology, content specific connections, and more. In a recent Twitter chat I commented that I wish I had joined in sooner- no joke! 

Twitter is also a way to connect with our students. One of my students forgot what time we were meeting yesterday for out practice AP exam and Tweeted me to find out the info. They will tweet me articles or info they find. Sadly, I just started using it with them...watch out next year. Just the other day I saw another teacher, Tara Becker-Utess (@t_becker10) conducting a review session via Twitter- yes on Twitter.   

Also, by connecting with other teachers and following Twitter chats you can collaborate outside of you site and subject. I am constantly amazed by my Twitter peers and wanting to challenge myself and students more. So come on and join the Twitter community. The steps are below along with a tutorial video. Please forgive the video, it is my first attempt- they will get better.


Step 1: Go to Twitter. Enter your name, email, and create a password. I would suggest not using your district email, but rather a alternate email account. Also, I would suggest creating a Twitter account to use with students and another to network with educators (PLN).


Step 2: Create a username. Twitter will automatically generate a username- don't be afraid to change it. Try to create a username with your last name and school/subject/mascot to make it easy for the students to remember. When creating a user name to use with educators keep it classy. Scroll down to create and hit the button to go on to the next step.


Step 3: Add people and groups/organizations to follow. You can add people by name, Twitter handle (@username), or type in a topic. Select organizations by category or select Skip (it's in very light font under the selection menu) to continue.


Step 4: Create your profile biography and insert an image. Select an image from your pictures folder to use. It does not need to be an image of yourself- use a school image, animated image, etc...anything is better than the generic Twitter egg. Type in a little background info about yourself and include a link to your website or blog if you have one.


Step 5: Congrats your on Twitter. Send out a Tweet and explore!

Tutorial Video:


Thursday, July 26, 2012

15 Engaging Tech Resources for the Classroom


Here are some resource to use in the classroom. They all have a connection to implementing the Common Core in performance tasks and College and Career Readiness Anchor Standards.

This was a FAVORITE of many of my students. I wanted a way to spark my student’s interests in working with primary sources. VoiceThread allows you to upload images, movies/video clips, and PPTs into the program. There are some nice ones online that teachers of Special Needs students have been using to show their students progress. You can pose questions for the students or have them annotate on their own. Students like it for the animation and “fun” value…they stopped dragging their feet to work with primary sources. The writing tool is great for annotating text and political cartoons. Hint: to have students work with documents or text, copy or type the text into a PPT, save the PPT as a JPEG, upload the PPT JPEGS into VoiceThread. Here is a sample from high school students where I digitized and modified a Teaching with Documents lesson from the National Archieves. App available  


Your presentations will come alive. You can import a PPT and modify it here. Alternately, you can type your text in directly and import video and images. Prezi allows you to set a motion path and rotate you text/images. This is great for uploading an image, political carton, or map and “hiding” your text (questions or notes). There a variety of teacher and student samples online. Students or other groups can also work on a Prezi collaboratively…Carreer Readiness. Hint: do not leave the Prezi open for others to edit out of the group. I had a student group working on a great Prezi and someone “vandalized” it overnight. We were so disappointed…they had done nice work in the computer lab. iPad app available
Create electronic posters with Glogster. Teachers can create a Glogster to introduce a unit topic or detail a main concept. Students can also create a Glogster to demonstrate mastery and/or use as their visual in a presentation. Student creation of Glogsters is also a way to meet the Common Core Literacy Standards and Technology Integration.

Create web quests with this easy to use website. Basically a web quest is an inquiry based lesson students complete online. You can sign up and create a free web quest. For a small fee you can create additional web quest. There is also a search feature to find web quests ready to go and use in your class. Students are given an introduction to the topic, performance task(s), resources, and a rubric for evaluation.

I LOVE this site. You become the curator of your own electronic magazine. Search for items online and Scoop then onto you topic page. You can add multiple pages to curate by topic, class, and more. Scoop it suggests articles based on the tags you give your topic page or you can add your own from the internet. The site also allows you to comment on the article/item and others can too. Not only is this great for teachers to use with their students, but students can also create their own magazine/journal and reflect on their article they’ve chosen. Other students in the class can comment too. This a great way for students to integrate and evaluate multiple sources of information, evaluate different points of view, produce clear and coherent writing, and use technology to produce and publish…all part of the Common Core Standards. A suggestion in using this in a global context is to have students use Newseum to find articles from around the world to curate. App available

                                                                                    Capzles
Create a visual timeline online with this tool. Add image(s) of an event, tag the date, and provide a description. There is also a comment feature to use with students…great for teachers and students to use. Another application would be to use it thematically such as a collection of Native American Art, photosynthesis process, characters in a piece of literature and so forth. App available

Students can create flash cards online. Very user friendly for the students. Study Blue allows students to have their flashcards in there hands anywhere they are if they have a smart phone. They can also be accessed online. App available

Photostory is a free download for PCs to make movies. You can add images, save a PPT as a JPEG and import the slides, and upload music into your own movie. Editing options include transitions, adding text in color, setting motion paths in the Ken Burns manner, and setting the timing. It is a basic movie making program…easy for students to use. A teacher friend of mine was making one and then her early elementary grandson did his own. Great for students to create a mini documentary or content trailer. Here is an online tutorial.  

This is a free and easy to use website maker. Also, if your students participate in History Day, this is the platform students must complete their websites in. They have a variety of themes and page design to choose from. You can pay to upgrade your site for more advanced features. Great for teachers and students to create an electronic portfolio or use for unit or topic assignments. App available


Ever had the problem of student work in a format that doesn’t open on your computer? Tired of emailing docs back and forth the collaborating remotely? Google Docs is your answer. Create documents, presentations, and more in Google docs and share…no more format issues. This also facilitates collaboration between peers and students in group projects. Teachers can also comment on student work and view when students have contributed. Sharing files between department members, PLNs, and students is made as simple as hitting the share button. You will need to have a gmail account to use, but that’s free. App available


Edmodo is a free class management system that functions like Facebook… student like this and have little problem navigating it. This is a great tool to post comments or question of the day and continue the dialog outside of the classroom. Teachers can separate students by subject, class period, or club. It is a closed site. Upon creation of your group, you are given an access code for your students to use when registering. Edmodo provides a variety of tools such as the ability to poll, quiz, continue discussions, and share information and resources. App available

Choose from a variety of sets, music, and characters to create your 3D animation to share or download. There is a free version and ones for purchase. Xtranormal allows teachers to set up classes, issue a class registration code, and manage assignments. You or the student creates the script… I suggest having the students complete a story board before moving to the computer. Students generally are very apt to navigating the program and think this is fun…a nice way to trick them into working. This has a variety of ELA Common Core and content area applications… colleges are using this too.

Turn your photos, video clips, and music into a video. Animoto allows you to create free 30 second videos, longer videos are available for $30 a year. Sign up for a App Available

Turn a photo into a talking image. Blabberize can be used as a hook or student assignment. Ideas for the classroom include having students select a figure and recording a speech, creating a song, poem, or narrative about a key figure, or having students research a person and then having them give their biography. App available

Tagxedo  
Take famous speeches, news articles, slogans and themes and turn them into a visually stunning word cloud, words individually sized appropriately to highlight the frequencies of occurrence within the body of text...a more creative Wordle.