Showing posts with label #1to1tech. Show all posts

Sunday, November 8, 2015

Analyze Political Cartoons with Google Drawing

Google Drive has a variety of tools. Personally, I tend to use and have my students use Docs, Slides, and Forms. One that I have not used is Google Drawing. I just saw the power of Google Drawing unleashed yesterday at San Diego CUE by Derek J Marshall and Raymond Lopez.

It was genius how they have their students use it to analyze cartoons. They have their students upload a political cartoon into the drawing as an image. Next, have the students draw the cartoon into quadrants. Then, break down the cartoon by quadrant using the drawing tools and comment/text boxes.

This would also be a great collaboration activity to have pair or a table group of four work on together.

Here are a couple of pics of the the samples that they shared with us in their session.


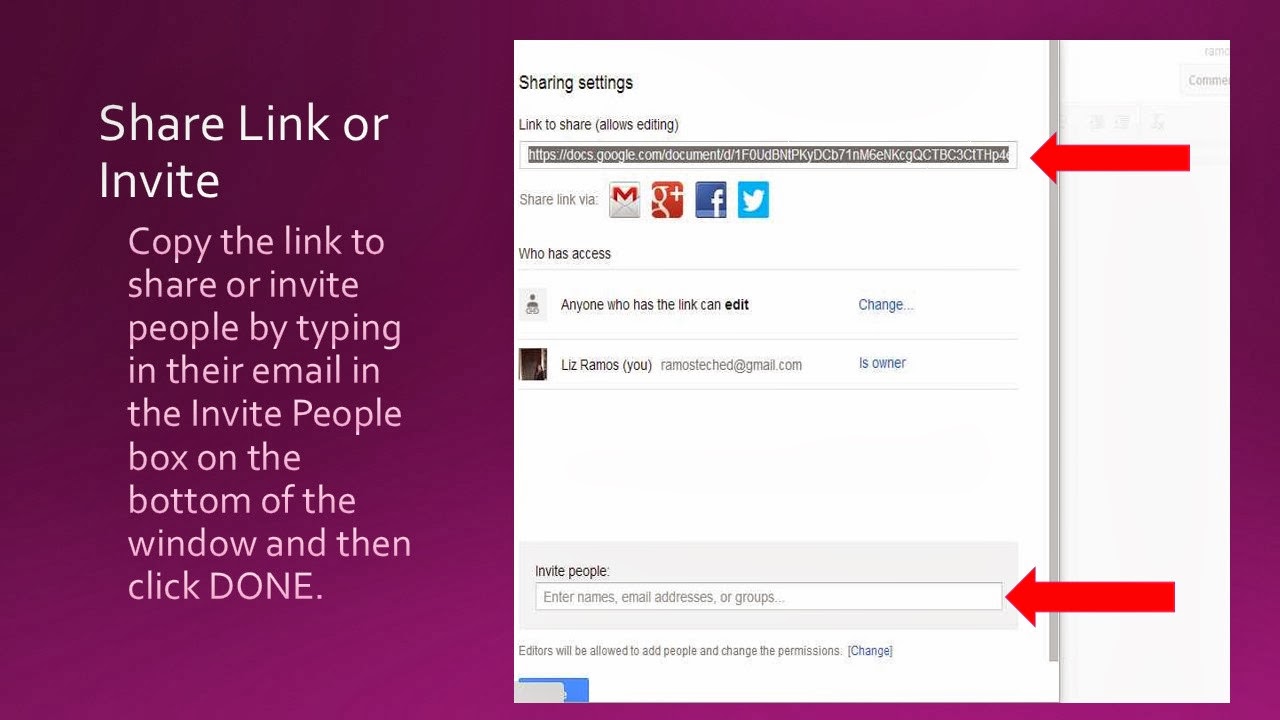
Below are the steps to using Google Drawing. You can also click HERE for a link to the steps to share with your students and peers.


 Get drawing!

Sunday, September 20, 2015

Listen to Current Events with Listen Current


Sometimes getting students to read about current events takes some encouraging. Many would rather listen to their earphones. Alternatively, some may have reading difficulties or be auditory learners. Here is where Listen Current comes to the rescue.  Listen Current utilizes public radio broadcasts of current events and stories related to History, ELA, and Science to help build students' listening skills. This is right in line with the Common Core. They also provide discussion questions that can be utilized as extension activities. There are a variety of topics available at the middle school and high school level to engage your students with.


Another great feature of Listen Current are there pre-made Socrative quizzes. (Socrative is a free data gathering tool that you can sign up for) You can check for understanding with your students quickly by having students go on to their electronic device whether it is a computer, tablet, or cell phone and take the quiz.

Let's get our students working on their listening and discussion skills and fostering their civic skills.

The process is rather simple to utilize the Listen Current quizzes. Just follow these steps:

Copy the code for the desired quiz and go to your Socrative account.

Go to the Manage Quizzes tab and select Create Quiz

Paste in the SOC- # in the Import a Socrative quiz from another teacher box

You can select the quiz settings to control the pace as the teacher or allow the students, as well as whether to display student names and randomize the question order.

Go to your Dashboard tab and select Start a Quiz

Have your students log in as students and give them you classroom number to have them take the quiz.


Monday, November 10, 2014

Flipping for News with Flipboard


Getting students to make connections with content and current events can be a struggle. Sometimes one wishes to categorize news articles by themes. You may want your students to curate news articles or Tweets with news articles or political cartoons by topic or unit of study. Flipboard allows you to do all of this and more.


I first came to experiment with Flipboard for classroom use after struggling with my students to watch or read the news and connect it to units of study. After thinking of how I was going to support my students, I remembered the magazine feature of Flipboard. I have had positive feedback from this and even have some of my Academy students, think homeroom, reading up on current events on their smart phones.

Flipboard is a fantastic app for viewing and creating news magazines. You will need to sign up and create your account on a smartphone of tablet after you download the app. Once you do this you can create your own magazines and add articles from Flipboard or search for items on Twitter.
Additionally, you can embed an individual magazine onto your class website using their HTML Magazine Widget. To do this, you will first need to go to the Flipboard Editor web page. Select the Magazine Widget. You will need to paste in the public URL for the magazine that you wish to embed. 

Next select the button to the right of the text box and the HTML embed code will appear in a box below. 

Copy this code and enter into your embed code box if you are using Weebly or follow the embed/HTML protocol of the website maker you are using. Now, your magazine will be integrated into your website page.

Another feature that Flipboard offers if you are 1:1 with ipads is that you can share the magazine and students can comment on the articles while they are in the app…like a discussion board.

Additionally, you could have your students create their own Flipboard magazines. When they curate and add an article, you could require them to comment their reaction or connection to a topic of study as well. You would need to have them share their Flipboard magazine with you- this can be done easily with a Google Form.


There are so many wonderful possibilities of ways to integrate Flipboard into your history classroom…get thinking.

Monday, October 20, 2014

Web based video options for iOs and computer/Chomebooks with Animoto and GoAnimate


Students are more visual these days and all about the videos. Why not challenge them to use this interest for educational purposes. Two easy and multi-platform options are Animoto and GoAnimate. As mentioned in the previous blog post, videos are a great way to set the hook and for students to demonstrate their understanding of a concept. While the free trials/versions are limited in length, concepts can be broken down into their parts for a class to examine a topic more in depth at the teacher’s discretion.

Animoto allows you to take images to create a video. This is great to do with primary source images or student drawings. They have a selection of music options to serve as the background music. To tell the story you can add text over the images. Another option is to have students add text to the images beforehand or create a PPT and save it as a JPEG to use in Animoto. You can create your production on a computer, tablet, or even using your smart phone. Animoto is free for a 30 second shareable video. To make longer downloadable productions, a Teacher Plus account costs $30 a year.

Here is a brief video I made for a Google Docs training shred session.


Google Tools Slam 2013

Another option for video making is GoAnimate. As the name suggests, it is an animated short. It took me a bit to get going on this, however my students were quick learners and ran with it. There are a variety of settings, characters, animations, and voices that one can choose from. You can also use your own voice. Again, storyboarding prior to recording facilitates the selection and production process. Animoto offers a free 14 day trial and is a paid product after that. They also have teacher and district licenses with more options available. Again, I have found the investment worth it.


Here is one my students made for their Civil Rights case presentation.

Saturday, October 11, 2014

iMovie & Trailers to Hook & Demonstrate Mastery


Hook your students with your next topic using iMovies and trailers. They are easy to create and you can set a mood of intrigue to bring your students along into historical inquiry. Not only can one introduce a topic of study, but why not yourself?


 If you have an iOS device you can easily create an iMovie or trailer. Trailers are great for a minute intro and come with preset themes and templates. Even better, Learning in Hand has storyboard planning sheets that make the production easier…especially when having students create a short video demonstrating their mastery of a topic.


If you or your students have access to iOS devices, select a topic, storyboard the transcript, THEN find images to correlate/support the text, have the script typed out and images in a folder labeled, and then assemble your production. You and your students can share your videos by emailing them if the file is not to large. An easier option is to upload your movie or trailer from your device to YouTube (if you have a Gmail account, you have a YouTube channel) and share via link or embed it on your teacher site. Students can also share their YouTube video link with you by collecting them in a Google Form for easier class management.


Sunday, September 21, 2014

Plicking for Understanding


Not everyone had money for class responders. Plickers has come up with a alternative for teachers using their smartphone or iPads. Download the app, print out student cards, create questions on the app question screen and you are ready to go. This is another alternative way to formative assess your students.


Monday, September 8, 2014

Collecting Data with Google Forms


Google Forms is a great tool for teachers to use. Most people rave about the utility of Docs and Presentations…. These are great too. There are so many possible uses for Forms in the classroom. One can survey a class, utilize it for “March Madness” takes on history, and create a DBQ with answer sheet for students. One of my favorite ways to use it is to collect student work. This is an especially great tool when students be presenting their work. If collecting digital products ahead of time, it makes for seamless class management. You will have all the assignments, no need for students to log in to sites to pull up their project, student groups unable to go because person x is absent, or group y can’t go because person z left their flash drive at home…You will have all products ahead of time.

Forms are quite simple to use. Select Form from the Google Drive Create button. Select the theme you would like to use, you can always go back and change this later on. I would suggest labeling the form with template at the end. I have found that creating a folder with your templates allows you to easily make copies for additional class periods and the years to follow. Select the type of question you want to ask and type away. If you want a question to be required, check the required box and students MUST answer this before submitting the form. You can even embed an image or video into your form. If you decide that you want to move questions around or copy a question to make minor modifications you can easily do this as well.

Once you are finished creating the Form, select how you want to issue it. As mentioned earlier, it is easy to select Make a Copy under file to copy a form and add the class period at the end if you wish. Make sure you select Accepting Responses to make the form live. Select the blue Send button to share the form. You can email the form, get a link to hyperlink to on your own class website, or get an embed code to embed on your class website. Once you have responses, you can go to your responses spreadsheet of select view responses. Responses will be time stamped. You can also select view Summary of Responses to view responses in a graph format for easy visualization.


Here are some sample Google Forms as a semester survey, to collect student work, and as a DBQ.


Saturday, May 31, 2014

Kahoots! for Formative Student Data


Today was the Think.Create.Share Conference at California State University Fullerton. I was excited to attend the sessions with some of the AMAZING Huntington Beach teachers and the opening AND closing keynotes were delivered by Amy Burvall. One tool that caught my eye in particular was Kahoots! Ted Lai, Educational Development Executive at Apple, used it as a formative assessment tool at the end of his Effective Technology Integration session. As I sat in my seat, I was thinking I have to blog about this and am DEFINITELY going to use this next year (school is over already).


Mr. Lai flashed up the url and game-pin on the screen, Next, we followed instructions and created a player name. He flashed a question before the screen, then the correct answer was displayed, the leader board appeared, and then the process repeated until our “quiz” was finished. As we played, teachers were getting excited and you could hear MULTIPLE conversations about what a great tool this was and how the teachers’ students would enjoy this!


Kahoots! is an online blended learning and classroom tool that students can use with their smart phones or tablet devices. Teachers can create quizzes, surveys, or discussions with their platform. Additionally, you may embed an image or video in your question! You can choose to set a time limit on the questions, but may also advance the slides quicker in class if needed. Students will gain more points the quicker they answer the questions. Once you create a quiz, you may publish it privately for your own use or publicly to share with others. The ability to publish publicly is a nice feature if you and your grade level, subject, or department are implementing common formative assessments or data teams.


This a great tool to use at the end of a class period as a formative assessment. You are in control and can reteach or clarify misunderstandings on the spot. Again, as many schools are developing and implementing CCSS lessons, Kahoots! facilitates the use of formative data to identify areas of student need to focus on for mastery. Another feature of Kahoots! is the ability to download results- another great feature for collaboration and data team analysis. But my school is not 1:1…. Not to worry. You can still use Kahoots! by pairing/grouping students up with those with smart phones and using a group name or table number.

Saturday, October 12, 2013

Collaborating with Google Docs


       Google Docs, housed on Google Drive, have a limitless possibility in the ways teachers can utilize them to meet the 4C's of the Common Core (creativity, collaboration, critical thinking, and communication). Additionally, using Google Docs eliminates the need for costly Microsoft software and formatting issues. How many times has a student told you their computer crashed, they lost their flash drive, student x is absent with the PPT/doc, they forgot to save the file, or the computer will not open the file? Google Drive eliminates all of this! It automatically saves the document, students can share the document and work on it at the SAME time ( I have had a whole class of 37 students working on 1 CST PPT for review at the SAME time), it is stored in the cloud, and eliminates the cannot open file issue with different formats. As long as you are connected to the internet, you can access the file. It is also available as an app on android and ios devices.

       To begin, have students create a Google Drive account. When in Drive, you can create a document (similar to a doc), presentation (similar to a PPT), spreadsheet (similar to excel), form, drawing, or folders. Once students get used to the sharing and privacy settings, Google Documents are transformational and students generally will gravitate to them. They also allow you to see the revision history so you can see exactly when and who was active on the document. Students can create a Doc and you can have them share it with you and/or another student enabled to comment. This can be used as an exercise to write , collaborate for revision, and then have the student revise the Doc for final submission. If you are completing a group project in class or for National History Day, multiple students may edit a document. Teachers may also have students create a folder with their writings/inquiry throughout the year to serve as an electronic portfolio.

     Here are the steps to creating a Google Document and sharing it:


Monday, September 23, 2013

Note-taking Tools

With teachers having multiple devices and students using tech tools in class and a different device at home, note taking platforms are in demand. Two options, which many teachers are using themselves and with students for portfolios, are Evernote and Notability.

Evernote works on a variety of platforms and syncs on multiple devices (android and ios). You can take notes on Evernote, insert images, and record audio with text notes. It is great for students who begin research in class at school and continue it later on. They can resume where they left off and retain links they saved earlier with Evernote's webclipper tool. Teachers and students can even save tweets too. Evernote provides a variety of tutorial videos to support its product.

Another product for note-taking is Notability. This is an ios app compatible with the ipod, iphone, and ipad. It is a $2.99 download from the Apple Store. While taking notes in Notability you can type, use touch screen with your finger or stylus, add images, capture a webpage, and record audio. Users may export their files in PDF or email and may back them up to Google Drive or Drop Box. Cnet has provided a guide for getting started with Notability.


Friday, June 14, 2013

CCSS Writing as Student Bloggers

Many students are reluctant writers. As educators, we sometimes need to hook or "gamify" tasks to engage our students. Blogging has done just that for many educators. Students start to become more engaged when they know their writing is public, even more so when collaborating with students outside of their own school site. Blogging provides a powerful medium for students to reflect on their learning, re-purpose gained knowledge to demonstrate mastery, and engage in historical conversation with their peers. All of this is supported in the CCSS Writing standards which call upon students to produce and distribute, utilize technology, write routinely, and write to inform and argue.

Last weekend I met with some educators for a Coffee Cue in Pasadena. Among the topics we discussed was blogging. Alice Chen, a middle school teacher, shared her experiences in having her students blog. She noted the power in her students writing and the connections they were making by being compelled to reflect. Also, she noted that it was a great medium for the shy students to use their voice and that her students were excited to converse with other classes including international ones. She mentioned a young writer in particular and the introspective examination she wrote about. She also shared a management tool for the blogs. Students are required to blog a number of times in the semester. To help manage this, students complete a Google form where they list the dates they blogged and copy their blog entry and this is done for extra blog posts for additional points as well.

There are a number of blog hosting websites for teachers to utilize. Many offer teachers the opportunity to keep the blogs private, select classes to collaborate with, moderate comment before publishing, and eliminate ads. Edublogs, Kidblog, and Class Press may be particularly more suited for the needs and concerns of the lower grades. When it comes to high school students, the ability of students to modify and personalize the template, integrate media, and share on their social media networks becomes of more importance. In these cases, Blogger and Weebly offer students more customization. These are just a few options for educators to utilize in their classroom.

Wednesday, May 29, 2013

Photo Apps for the 2.0 Classroom

While most people think of text when they think of literacy, visual literacy is just as important. This clearly comes across when one looks into CCSS. At a recent Discovery DENin in Irvine, teachers from across the country spent time examining the CCSS and tech integration. One of the sessions was APP Hour. I had never participated in one before. Teachers went up and shared an app that they used in the classroom. There were teachers, tech coordinators, and librarians from both public and private schools servicing Special Education, general, and GATE students. I was blown away by the photo apps being utilized by the lower grade teachers and how they were using them to demonstrate visual literacy, by themselves as well as by the students.

Photos give students a creative way to demonstrate their knowledge of a concept. In fact, it can be more challenging at times to select the correct images to tell the story. Teachers would sometimes use the images as collages for intro of a unit, do now to connect to the night prior's reading or previous day's material, or have the students create one for a given topic. Photos are a powerful way to tell a story, especially given the visual nature of today's students. Below are a few of the photo apps shared.


Pic Collage
PicCollage lets you instantly arrange your photos into frames - or get creative with freeform collages, cutouts, filters, borders, stickers, and text. Your friends will be amazed with what you can create. It's like photoshop with your fingers!


Instapicframe
Instapic frame helps you combine multiple photos into amazing looking shells/frames/collage and share them with world via Instagram, Facebook, Email, Twitter. With 55 fully adjustable frames, rounded corners, photo effects, shadows, plenty of patterns and an easy color picker you will always have a unique and distinctive look.


Strip Designer
Add photos from your photo album or draw your own sketches. Apply simple image filters to increase the impact of photos, and add speech balloons Add advanced textual elements and stickers to get that genuine comic book feel. When you are done, save the resulting image to the iPhone's photo album, email it to friends and family or share it with Flickr, Facebook, or twitter.


Type Drawing
TypeDrawing is a really easy app to use, but it's perfect for creating TYPOGRAPHY ART and UNIQUE WATERMARK over your photos. If you love typography, this poetic visual art app is absolutely yours. Start by typing a sentence you want to say, and then just draw with your finger. This simple action leads you to make stunning typography arts and wallpapers


Word Salad
Make great wordsalads out of documents that matter (or not) to you! With WordSalad you can make beautiful word clouds, super customized with different fonts, colors and words layouts.